How to improve technical skills as a mobile app tester (Part 3)

QA with 5 years of commercial experience. I am mainly a mobile apps tester and I share my knowledge by writing articles. I am also involved in process improvement. Privately I am a former player of the Polish national field hockey team.
The previous part of this article outlined the steps that will come in handy when testing an application using the tools necessary during software development. It was learning a few terminal commands that allow moving between directories, basic commands of the git version control system, the rules of this system and a look at a fragment of the GitLab environment interface. This part will be about getting to know the process of building a project locally through Xcode and practical examples related to learning how to work with and understand code to mocking data. This article is mainly aimed at iOS testers using macOS.
Step 3 - Configuring and using Xcode
Integrations
- The first step of the integration will be to install the necessary tool, that is Xcode. The latest downloadable version can be found here. Before you start building a project, it's a good idea to pay attention to the version of Xcode you're currently using. Choosing the latest or too outdated can sometimes cause problems when trying to work on a project. A suggestion for the version which you should choose to build the project can usually be found in the Readme.md file (the project documentation). It should reside in a repository on a platform used to host a Git repository like GitHub. It usually contains information about the dependencies in the project and how to build it. Most of the projects have it, but if it is not so, it's worth suggesting it to the developer or the whole team. It is also important to make sure that the file is up-to-date as there is a high probability of forgetting to make changes to it.
Tip:
You can make managing Xcode versions much easier for yourself by using the [xcversion tool](https://github.com/xcpretty/xcode-install#readme)
- The second step will be to execute the necessary steps to build the project on the command line (terminal/iTerm). Developer's help is important here as without experience it can be hard to go it alone because there are usually all kinds of problems along the way. Most of the steps only need to be performed once on a device for a given repository, so there is a good chance that building a project in the future will require less work. Nevertheless, with the help of this article, you will be able to practise the basic configurations yourself. In the project created for this article, you will be using GitHub, so that is where you should look for the README.md file
Steps to be followed to build and open a project in Xcode:
- Open terminal
- First, you can use the commands: "pwd and ls" - but these are not mandatory items
- Type for example "cd Desktop" to create a folder here to which you will clone the project
- Type "git clone https://github.com/newdiscoblack/15MinPicture" (link to the repository on GitHub where the project is located)
- Type "cd 15MinPicture" - open the folder where the project is located on the Desktop
- And finally, you open the finished project in Xcode by typing: "open One\ Picture.xcodeproj" (the name of the Xcode file that is in the folder with the cloned repository)
Xcode
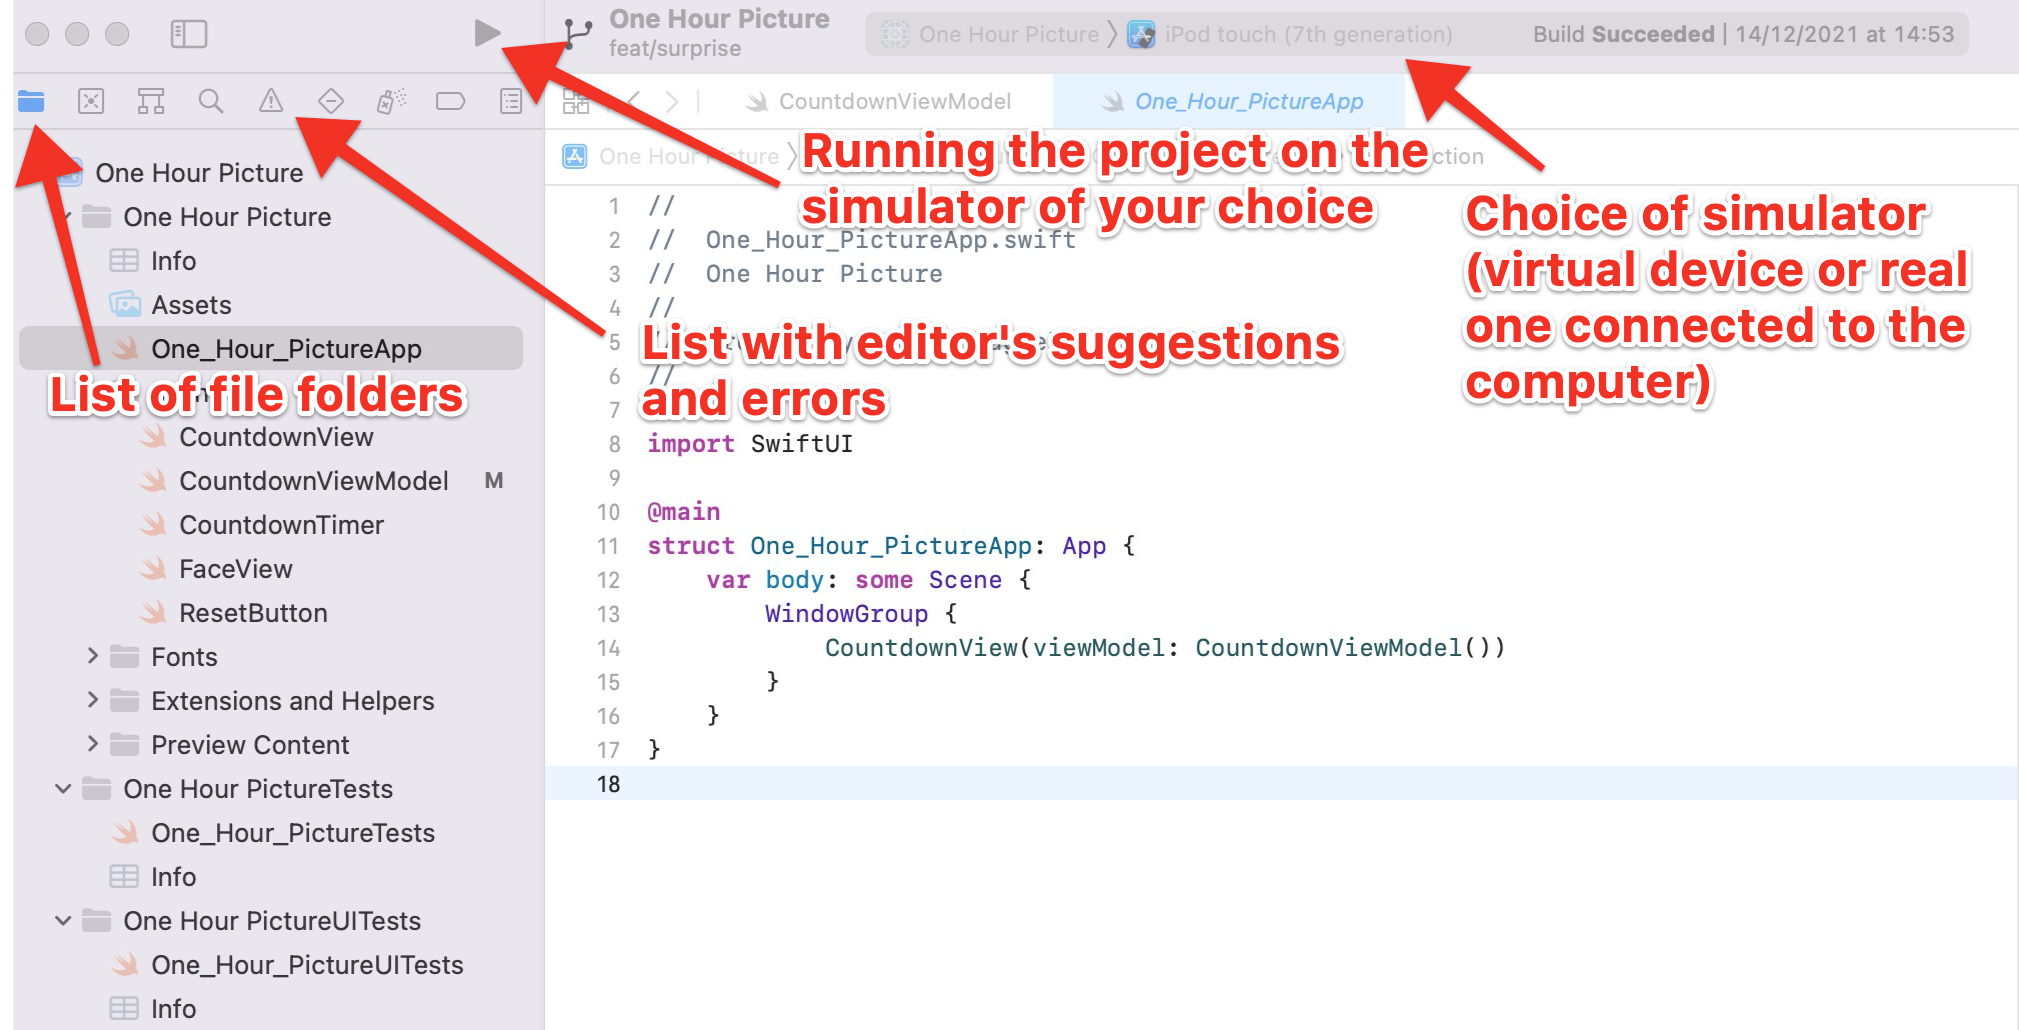
Once you have an open project in Xcode substantial to begin with, there are really only a few options. The first step after opening it should be to use the command⌘ + B shortcut to build the project and see if Xcode shows any errors. The second step is to select the simulator or connected device to the computer. The third step is to use the project launch button. The main options are described below in the picture.
Step 4 - Practical examples of using the code
Exercise no.1
Mocking data in the code (simulating a certain part of the code in such a way that it produces a result specified by you) - In this task it will be changing the default timeout value (15 minutes) to a shorter one (2 minutes). This will save a lot of time if you have to repeat the test multiple times.
**Description: **
The timer counts down the time the image is displayed. In the case of our project, the default is 15 minutes. This time is set in the application and not by the API, so we are able to change its value in the code for the test.
Expected Result:
- 2 minutes before the end of the time the clock should blink red
- When the time is up, the picture should disappear
While being at the beginning of the adventure with mocking data and having no programming knowledge, it is difficult to move around the project code on your own. So before you start testing, it's best if the developer gives you some helpful information about where in the code you need to change a value to get the desired effect. In this exercise these will be:
- The name of the folder is MainScene. You will find this name in the list of file folders.
- The filename is CountdownViewModel.swift. You need to search for this file in the MainScene folder.
- Variable, which in this case is timeRemainingAtTheStart. Look for it in the CountdownViewModel.swift file.
Tip:
An easy way to search is to use the shortcut Shift + command + O, which will open the "Open quickly" bar. By using this option, you can easily search for interesting files, objects and even functions etc. and open them immediately.
In our exercise, you need to change the value of the variable from fifteenMinutes to twoMinutes.
What this variable looks like in the code when you open the project:
private var timeRemainingAtTheStart:
 TimeInterval = .fifteenMinutes
What this variable looks like after the swap:
private var timeRemainingAtTheStart:
 TimeInterval = .twoMinutes
After making this change, you build the project (using the command⌘ + B shortcut) and then open it locally or in the simulator (using the project launch button on the top panel in Xcode). The timer should indicate 2 minutes to go and blink red. After 2 minutes, the image will disappear. Do not close Xcode and the terminal because you will need them for the next task.
Attention!
Naming in a project requires special attention. Folders, files, objects, methods, etc. should be named by developers in an understandable way that is consistent with their use. More importantly, the name must reflect the functionality for which it has been created. Once the tester starts using the code in their work, they should give feedback to the developers about the incomprehensible name, which should be changed.
Exercise no.2
A tester who wants to shorten the time of giving feedback to a developer about the quality of software, can test the version in the repository from the branch where the feature or bug fix is being worked on. However, remember to check these changes again when the version is released on a branch where complete functionality is ready for testing, such as "Develop". This is important because integration issues may arise with new, different code changes.
**Description: **
After locking the data in task one, currently the image in the application displays for 2 minutes. The clock blinks red and counts down this time.
Expected Result:
- When time is up, you want to see a gift instead of a picture
The first step you need to take is to open the GitHub platform. This project has never been released to a service that allows you to download testing versions of mobile applications like firebase. Therefore, you will only need the name of the branch (in case it has been released then you need the version number). With GitHub open with a given repository, in the code tab, select tab branches and then active branches. Under active branches you should find and copy the name of the branch, which contains the feature you need. Once you have it, open the console and, without changing anything, type "git checkout feat/surprise" and confirm with enter. The project should automatically update itself. Follow the same steps again as described in step 3 under "Xcode" to open the project. You end up seeing 2 minutes to go on the clock and blinking red. After 2 minutes, a gift is shown instead of a picture.
After testing, when you want to return to the location from which you moved to the feat/surprise branch, you need to type "git checkout master". At the very end, you can remove all your changes irretrievably by typing "git clean -fd". However, if you want to keep the changes temporarily in the clipboard, type "git stash" and to restore them, type "git stash pop".
Summary:
All three parts of this article should help you get into the technical world of testing easily. The whole thing has been created as a part of the leadership at our company between a tester and an iOS developer. This section contains exercises and some tips to put into practice. Learning more about how the Xcode editor works and how to work with the code itself can allow you to test features in a different way than before. Additionally, the knowledge gained and the communication with the developer will increase the efficiency of the process itself.
If you haven't had a chance to read the previous parts of this article, you can make up for it by going to Part 1 or Part 2 of this article.