How to Migrate Your App to Flutter: A Technical Guide

I always seek a place to level up the team and improve project velocity. Flutter and Android Developer with over 7 years of experience.
If you’re grappling with legacy code, rising operational costs, or the need for a faster development cycle, it might be time to consider migrating to Flutter. This guide will walk you through the technical steps and benefits of transitioning to this modern framework, showing you how Flutter can revolutionize your app's performance and maintainability.
Why should you consider migrating to Flutter?
Migrating an application to a different technology stack is a significant decision that can profoundly impact your project's future. Whether it's driven by the need to reduce costs, accelerate development, or address the challenges posed by legacy code, moving to a modern framework like Flutter can be a strategic move. Here are two of the most important scenarios where migrating to Flutter might be the right choice for you.
Legacy Code Challenges
Legacy code often becomes a bottleneck as your application evolves. Over time, codebases tend to grow in complexity, especially if multiple developers have contributed to the project over the years. This can lead to several issues, including:
- Maintenance Difficulties: Legacy code can be difficult to maintain, particularly if it was written using outdated practices or needs proper documentation.
- Security Vulnerabilities: Older code might not meet current security standards, exposing your application to potential threats.
- Performance Issues: As technology advances, legacy code may struggle to keep up with modern performance expectations, resulting in slower app speeds.
- Development Constraints: Implementing new features or updates can become increasingly challenging and time-consuming.
Migrating to Flutter can address these challenges by providing a modern, well-supported framework that simplifies maintenance, enhances security, and boosts performance. Additionally, Flutter's vibrant developer community ensures ongoing support and innovation.
High Operational Costs
Maintaining separate codebases for iOS and Android is resource-intensive. It requires dedicated teams, tools, and processes for each platform, which can lead to:
- Increased Operational Costs: Two separate teams mean higher labor costs, more communication overhead, and additional project management resources.
- Knowledge Silos: Separate teams often develop their own practices, leading to a lack of shared knowledge and making it harder to ensure consistency across platforms.
- Slower Development: Synchronizing development efforts between two teams can slow down the release of new features and updates.
Flutter's cross-platform capabilities allow you to maintain a single codebase for both iOS and Android, significantly reducing operational costs. A smaller, unified team can work more efficiently, resulting in faster time-to-market and lower labor costs. This streamlined approach not only improves productivity but also ensures a consistent user experience across all platforms.
How to migrate your App to Flutter?
Migrating an app to Flutter is not a one-size-fits-all process. The approach will vary depending on the specifics of your project. Some key factors to consider include:
- Project Size: Is your project small or large?
- Core Features: Does your app have one core feature or many?
- Third-Party Services: What third-party providers does your app use?
- Device Services: What device-specific services does your app rely on?
- Current Technical Issues: What are the existing technical challenges in your app?
- Backend API: Is your app standalone, or does it connect to a backend API?
- Roadmap: What is your current development roadmap?
- Problematic Features: Are there any features that consistently cause issues?
One viable migration strategy is to use Flutter's Add-to-App feature. This allows you to integrate Flutter modules into your existing native application gradually. Whether you start with a single UI component or a full feature, this approach ensures a smooth transition without disrupting your current operations. Additionally, this flexibility allows you to reassess and adjust your migration strategy as needed.
Integrating Flutter to Android
Once we have your Android Application we need to create a new module, a Flutter module. There are multiple ways to do it, some IDE’s have built-in tools, but let’s focus on the universal way using a command line. In the path of your Android project run:
flutter create -t module --org com.example flutter_module
Argument --org allows us to set up your package name, which can also be set later. flutter_module is the name of the module you want to create.
Then fetch Flutter’s dependencies:
flutter pub get
The next step is to add the Flutter module as a dependency to the Android project in Gradle. This can be done two ways: using Android Archive (AAR) or Module Source Code. The AAR packages your Flutter module into a standalone format and doesn’t require Flutter SDK installed but an additional build step is needed. With Module Source Code it’s possible to build the app in one step but the Flutter SDK is required.
To generate AAR we need to enter the Flutter module directory and run the command:
flutter build aar
After that, we need to follow 4 easy steps to run Flutter inside the native application:
- First of all we need to add dependencies in the settings.gradle file of the Android project, under the dependencyResolutionManagement section we need to providethe Flutter SDK:
dependencyResolutionManagement {
    repositories {
        maven {
            url = uri("/path_to_android_project/flutter_module/build/host/outputs/repo")
        }
        maven {
            url = uri("https://storage.googleapis.com/download.flutter.io")
        }
    }
}
- Next in the app/build.gradle file of Android project, under the dependencies section we need to add the Flutter module to your Android app:
in Groovy DSL
    dependencies {
      debugImplementation "com.example.flutter_module:flutter_debug:1.0"
      releaseImplementation "com.example.flutter_module:flutter_release:1.0"
    }
or Kotlin DSL
       dependencies {
           debugImplementation("com.example.flutter_module:flutter_debug:1.0")
           releaseImplementation("com.example.flutter_module:flutter_release:1.0")
    }
- Next, we need to add Flutter activity in the AndroidManifest of Android project
<application>
    <activity android:name="io.flutter.embedding.android.FlutterActivity" />
</application>
- Finally, it’s only about launching Flutter inside your native code wherever you want it to start i.e. when the user clicks some button.
startActivity(FlutterActivity.createDefaultIntent(this))
That’s it, we have the Flutter app inside the native app.

Integrating Flutter to iOS
Once we have iOS Application we need to create a new module, a Flutter module. There are multiple ways to do it, some IDE has built-in tools to do it but let’s focus on the universal way using a command line. In the path of your iOS project run:
flutter create -t module --org com.example flutter_module
Fetch Flutter’s dependencies
flutter pub get
and build Flutter to iOS
flutter build ios-framework --output=.ios
In the next step, we need to integrate the Flutter module into the iOS project, we do it using Podfile. In the directory of the iOS project run the command:
pod init
Write the following code, where iOSProject is the name of your project:
flutter_application_path = '../flutter_module'
load File.join(flutter_application_path, '.ios', 'Flutter', 'podhelper.rb')

target 'iOSProject' do
  # Comment the next line if you don't want to use dynamic frameworks
  use_frameworks!

  # Pods for addtoapptest
  install_all_flutter_pods(flutter_application_path)

  target 'iOSProjectTests' do
    inherit! :search_paths
    # Pods for testing
  end

  target 'iOSProjectUITests' do
    inherit! :search_paths
    # Pods for testing
  end
end

post_install do |installer|
  flutter_post_install(installer) if defined?(flutter_post_install)
end
After saving a file, run the command:
pod install
Then open the newly generated iOSProject.xcworkspace (note: make sure NOT to run iOSProject.xcodeproj as you will not have access to the Flutter module).
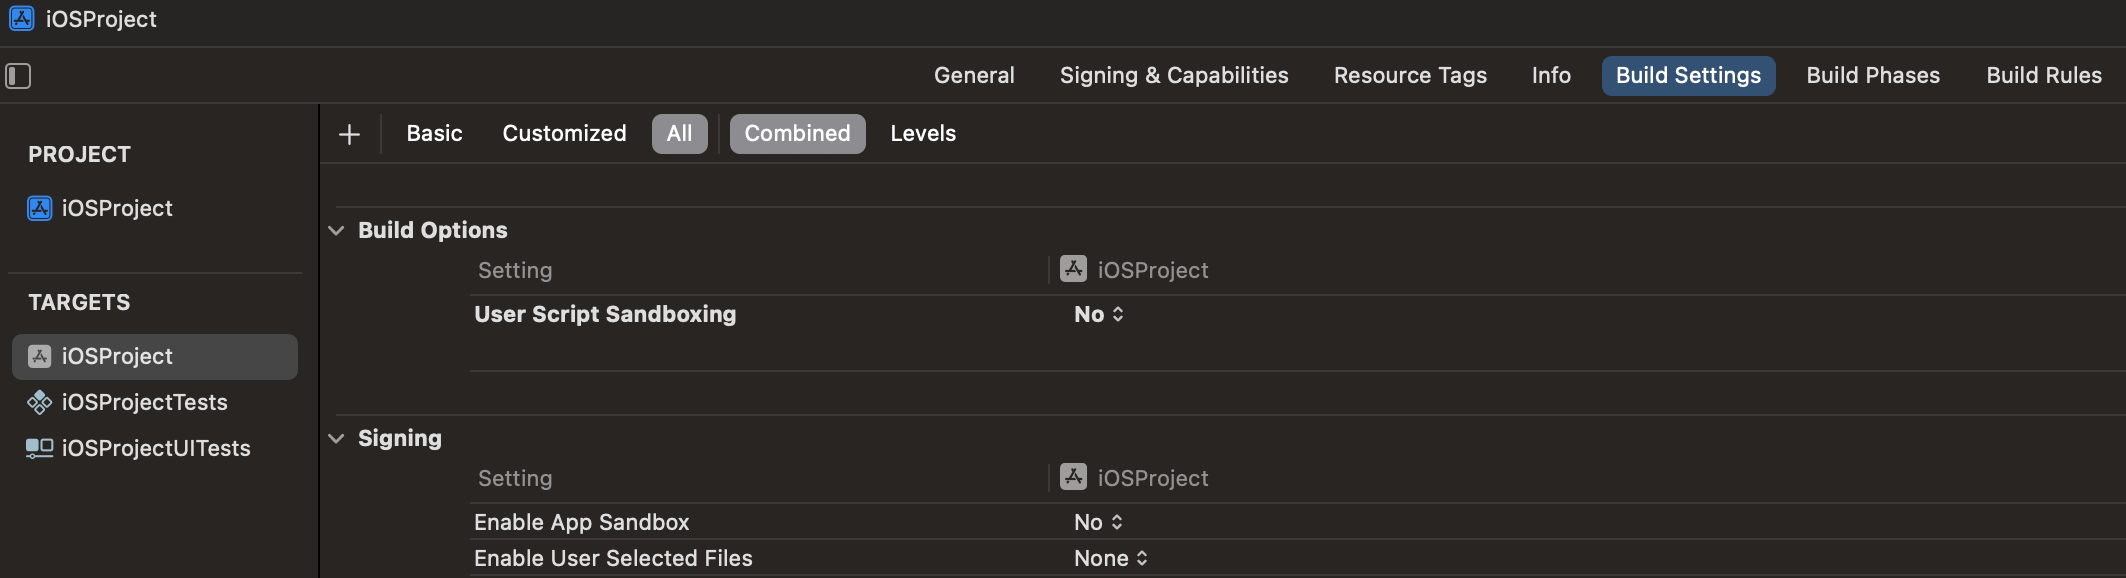
The final configuration step is to open the Build Settings of your project and finding Build Option User Script Sandboxing and setting it to No.
Then inside the class when you want to launch the Flutter module, we need to import these libraries:
import Flutter
import FlutterPluginRegistrant
We need to create a Flutter Engine and run it:
let flutterEngine = FlutterEngine(name:"flutter_module_engine")

init() {
    flutterEngine.run()
    GeneratedPluginRegistrant.register(with: self.flutterEngine)
}
Finally, it’s only about launching Flutter View wherever you want it to start i.e. when the user clicks some button.
func launchFlutter() {
    guard
        let windowScene = UIApplication.shared.connectedScenes
            .first(where: { $0.activationState == .foregroundActive && $0 is UIWindowScene }) as? UIWindowScene,
        let window = windowScene.windows.first(where: \.isKeyWindow),
        let rootViewController = window.rootViewController
    else { return }

    let flutterViewController = FlutterViewController(engine: flutterEngine, nibName: nil, bundle: nil)
    flutterViewController.modalPresentationStyle = .overCurrentContext

    rootViewController.present(flutterViewController, animated: true)
}

Are you ready to migrate to Flutter?
Migrating to Flutter can significantly enhance your application's maintainability and reduce costs. The flexibility of Flutter’s Add-to-App feature allows for a tailored migration approach, ensuring minimal disruption to your existing operations. If you’re considering migrating to Flutter, we’re here to help evaluate your project and develop a migration strategy that suits your needs. Let's discuss your specific needs and explore how Flutter can benefit your project.